
Introduction to No Bake Peanut Butter Granola Cups
If you’re a young professional juggling a career, social life, and perhaps a side hustle, quick snacks can become your best friend. Enter the no bake peanut butter granola cups, perfect for anyone who needs a nutritious boost without the fuss of traditional baking. These tasty treats combine the goodness of granola, the richness of peanut butter, and the indulgence of chocolate, offering a delightful balance of flavors that satisfies your sweet tooth while keeping you energized throughout the day.
The beauty of these granola cups lies in their simplicity. Made with just a handful of ingredients, they can fit seamlessly into your busy schedule. You can whip them up in about 15 minutes, and with minimal cleanup involved, you’ll have more time to focus on crushing your goals. Plus, they store well in the fridge or freezer, making them a perfect make-ahead snack option for those hectic weekdays.
Want more info? Check out sites like Healthline for insights on the benefits of granola and peanut butter. Or visit Mindful Chef for more healthy snack ideas that fit your lifestyle. So why not treat yourself to something delicious and wholesome today? You deserve it!
Ingredients for No Bake Peanut Butter Granola Cups
Must-have ingredients for delicious granola cups
Creating your own no bake peanut butter granola cups at home is not only easy but also incredibly satisfying! For these tasty treats, you'll need a few essential ingredients to get started:
- Granola: This forms the crunchy base of your cups. Opt for your favorite brand or make your own!
- Chopped peanuts: These add that delightful nutty flavor and extra texture.
- Peanut butter: A must-have for both the mixture and filling, giving these cups their signature taste.
- Honey: Acts as a natural sweetener and helps bind the ingredients together.
- Melted peanut butter: For a gooey center that's irresistible.
- Dark chocolate: Perfect for a rich topping that adds depth to your treats.
- Coconut oil: Helps the chocolate set smoothly on top.
Optional ingredients to customize your cups
Want to make your no bake peanut butter granola cups truly your own? Consider adding some of these optional ingredients:
- Chia seeds or flaxseeds: For a boost of nutrition and fiber.
- Dried fruits: Like cranberries or raisins, to add a chewy texture.
- Nuts: Use almond slices or walnuts for added crunch.
- Cinnamon or vanilla extract: A sprinkle of either can enhance the flavor tremendously.
Feel free to mix and match based on what you have on hand or your taste preferences! For more inspiration, check out Healthy Eating or Nutritious Recipes for ways to elevate your snacks.
Preparing No Bake Peanut Butter Granola Cups
Making no bake peanut butter granola cups is a fun and easy process that allows you to enjoy a delicious, nutritious snack without turning on the oven. Whether you're looking for a meal prep option for busy weekdays or a sweet treat to satisfy your cravings, these cups are perfect. Let’s walk through the steps together!
Gather and Measure Your Ingredients
Before diving into the recipe, it's essential to gather all your ingredients. Here’s what you’ll need:
- 2 ½ cups granola
- 1 cup chopped peanuts
- 3 tablespoons peanut butter (plus more for the filling)
- 3 tablespoons honey (this can be adjusted to your sweetness preference)
- 12 oz. finely chopped dark chocolate (for the topping)
- 1 tablespoon coconut oil (to help with melting the chocolate)
Take a moment to measure everything out; having your ingredients ready will streamline the process, making it much more enjoyable.
Combine Dry Ingredients for the Base
Next, in a large bowl, combine your measured granola and chopped peanuts. This mixture provides the base for your cups, and it's where the crunch begins! Once combined, gently fold in the peanut butter and honey. The key here is to mix until everything is well-coated, creating a sticky but manageable mixture. If it feels too dry (which might happen depending on your granola), don’t hesitate to add a little more honey — it’s your creation, after all!
Create the Sticky Mixture with Peanut Butter and Honey
This step is crucial for achieving that perfect granola cup consistency. The mixture should be sticky enough that when you press it into the cupcake pan, it holds its form. Think of it as building a solid foundation—one that will support the deliciousness to come!
Form the Cups in the Cupcake Pan
Take a greased cupcake pan and start dividing your mixture into 12 equal portions. Gently but firmly press the mixture into each compartment. Make sure to create a dent in the center of each cup; this is where your peanut butter filling will go later. It may get a bit messy, but that's part of the fun!
Freeze Until Firm and Add the Peanut Butter Filling
Pop the filled cupcake pan into the freezer for about 5-10 minutes until the cups get firm. Once they're set, carefully remove them and pour a bit of melted peanut butter into the center of each cup. This is where the magic happens — a gooey, delicious center that complements the crunchy base!
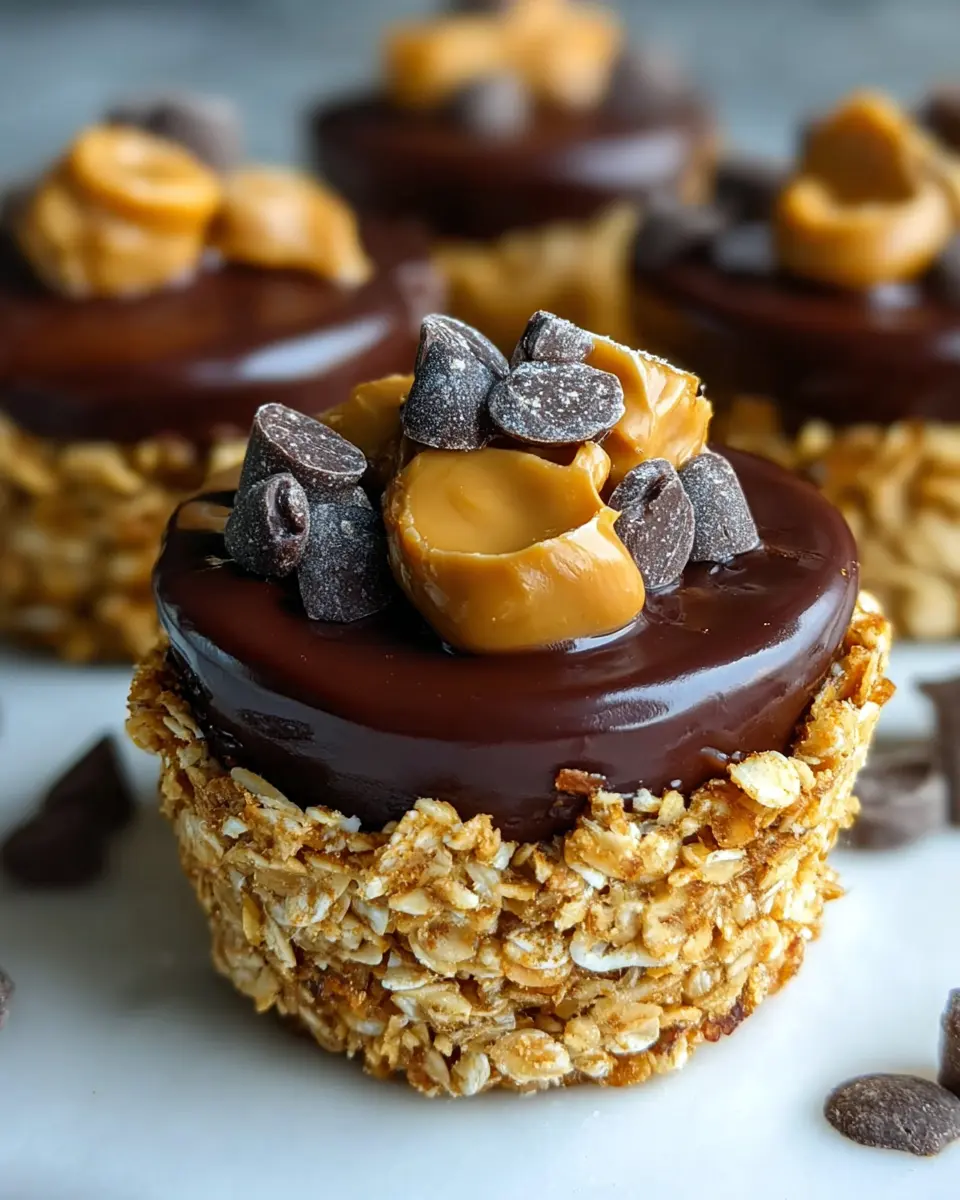
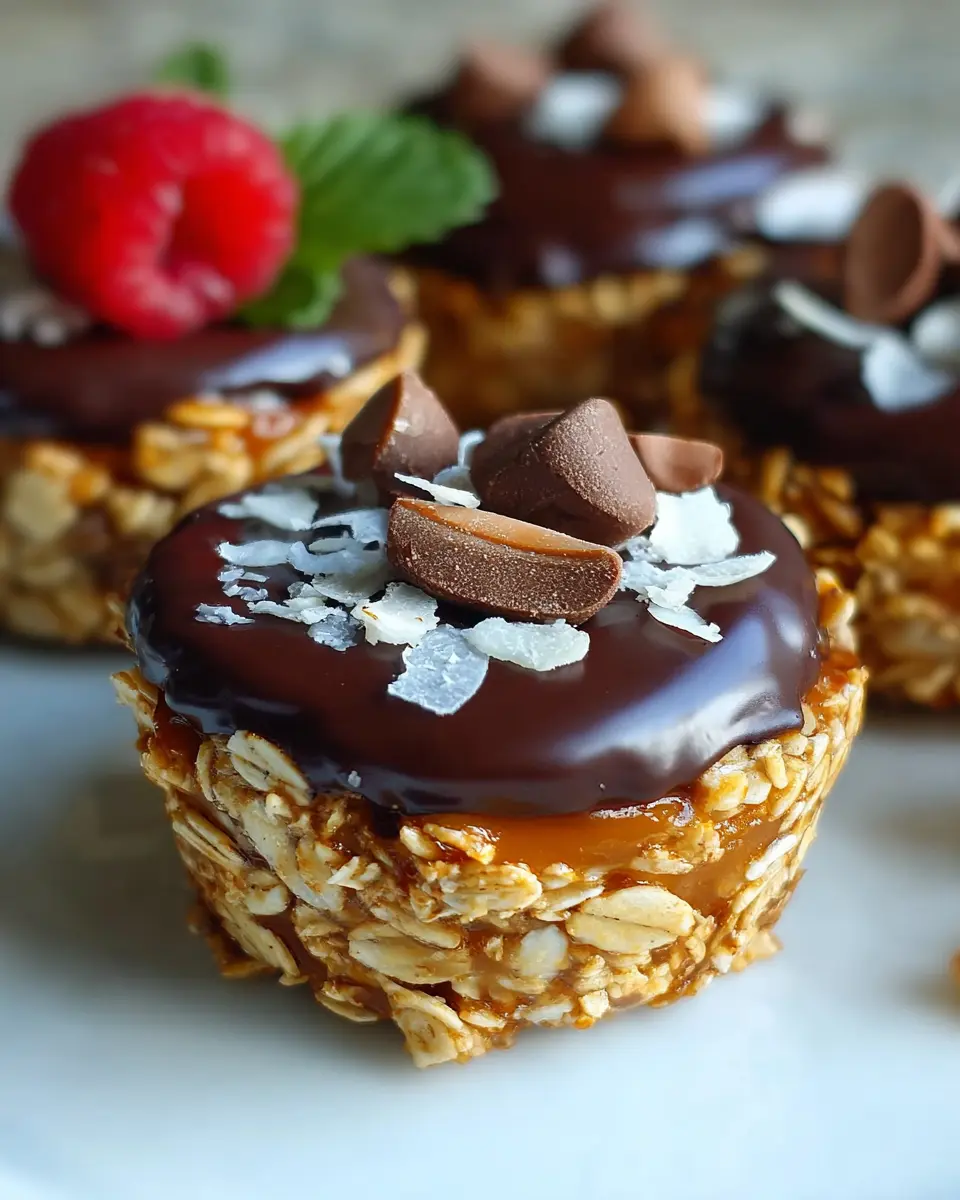
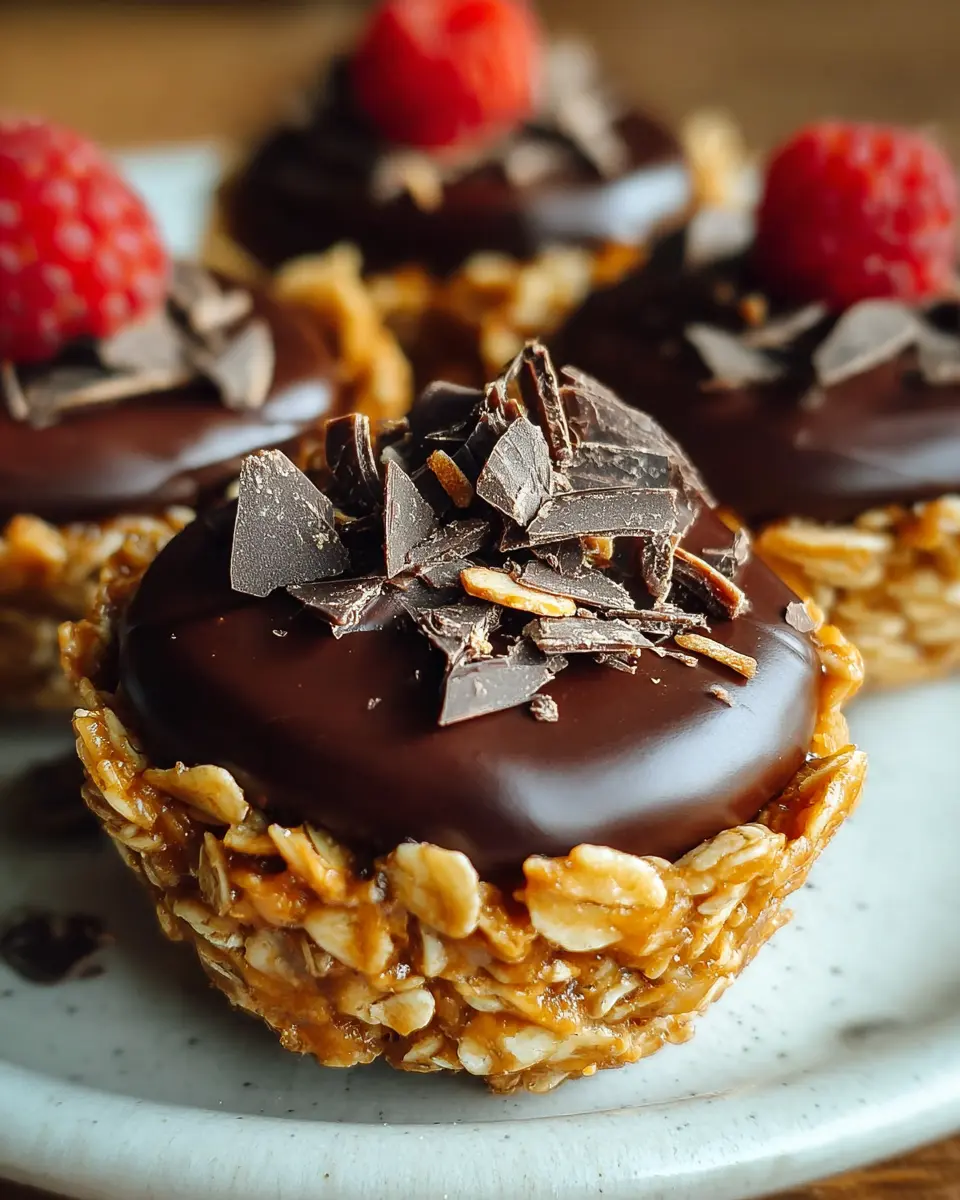
Top with Melted Dark Chocolate and Chill
For the final touch, melt the dark chocolate together with the coconut oil. This will create a silky topping that not only looks stunning but tastes incredible. Spoon the melted mixture over each cup and then return them to the fridge to chill until the chocolate sets.
Before you know it, your no bake peanut butter granola cups will be ready to devour! They can be stored in an airtight container in the fridge or freezer for those moments when you need a quick, satisfying treat. Enjoy your homemade goodness!
Variations on No Bake Peanut Butter Granola Cups
Elevate your no bake peanut butter granola cups with these tasty variations that cater to your cravings. Each adds a unique twist, making it easy to experiment with flavors.
Chocolate Chip Granola Cups
Transform your cups into a chocolate lover's dream by folding in mini chocolate chips into the base mixture. The melty chocolate inside pairs beautifully with the creamy peanut butter filling, providing a decadent surprise with every bite. You could also sprinkle a few chips on top of the chocolate layer for a delightful finish.
Trail Mix Granola Cups
Looking for something a bit more adventurous? Mix in your favorite trail mix ingredients, like dried cranberries, sunflower seeds, or even coconut flakes. Not only does this add an appealing crunch, but it also infuses a variety of flavors, making your no bake peanut butter granola cups a delightful snack for outdoor adventures or cozy nights in.
For more ideas, check out resources on healthy snacking at Healthline or find inspiration on BBC Good Food.
Cooking notes for No Bake Peanut Butter Granola Cups
Tips for achieving the perfect texture
To create the ideal texture for your no bake peanut butter granola cups, ensure you press the granola mixture firmly into the cupcake pan—this ensures they hold their shape. If the mixture feels crumbly, a bit more peanut butter or honey can help achieve a sticky consistency. Don't rush this step; a well-pressed mixture means no crumbling later!
How to adjust sweetness levels
Sweetness is subjective, so feel free to adjust as needed! If you prefer a sweeter cup, simply add more honey during mixing. You can also replace honey with maple syrup for a different flavor profile. Here’s a fun tip: tasting a small amount of the mixture before freezing can help gauge your preferred sweetness. For more guidance on sweeteners, consider checking out resources from nutrition experts on the benefits of natural sweeteners.
By keeping these tips in mind, your no bake peanut butter granola cups will be the perfect blend of flavor and texture!
Serving Suggestions for No Bake Peanut Butter Granola Cups
Perfect Pairings for Dessert Time
No bake peanut butter granola cups are delightful on their own, but why not elevate your dessert experience? Here are some perfect pairings:
- Fresh Fruit: Serve with sliced bananas, strawberries, or a scoop of your favorite berries for a refreshing contrast.
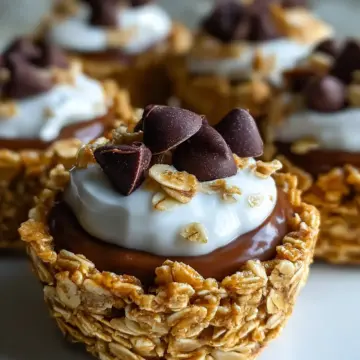
- Yogurt Topping: Add a dollop of Greek yogurt on top for a creamy, protein-packed twist.
- Nutty Drizzle: Drizzle additional peanut butter or almond butter on top to enhance the nutty flavor.
Creative Ways to Use Leftover Ingredients
Utilizing leftover ingredients can save time and minimize waste:
- Granola Mix-Ins: Use any extra granola in your breakfast smoothie or as a topping on oatmeal.
- Peanut Butter Flavoring: Incorporate leftover peanut butter into your morning pancakes or waffles.
- Chocolate Coating: Melt leftover chocolate for drizzling over fruit or to create a quick chocolate bark.
With these suggestions, your no bake peanut butter granola cups can become a versatile staple in your dessert repertoire!
Time breakdown for No Bake Peanut Butter Granola Cups
Preparation time
You’ll need about 15 minutes to whip up these delicious no bake peanut butter granola cups. This includes mixing the ingredients and preparing your cupcake pan.
Freezing time
To ensure your cups achieve the perfect firmness, allow them to freeze for about 10-20 minutes total — 5-10 minutes after pressing the granola mixture and another 5-10 minutes after adding the melted peanut butter.
Total time
In just around 35 minutes, you can have delightful no bake peanut butter granola cups ready to enjoy, making them perfect for a quick snack or indulgent dessert. For more detailed information on the ingredients and cooking process, you can check out the full recipe!
Nutritional Facts for No Bake Peanut Butter Granola Cups
Calories per serving
Each serving of these delightful no bake peanut butter granola cups packs approximately 200 calories. This makes them a satisfying treat without derailing your healthy eating habits.
Sugar and protein content
In terms of sugar, each serving contains around 10 grams. This is relatively moderate, especially considering the delightful sweetness of honey and chocolate. Plus, you're getting 6 grams of protein, thanks to the granola and peanut butter, supporting muscle health and keeping you fuller for longer.
These cups not only satisfy your sweet tooth but also provide a good balance of nutrients. If you're curious about other healthy snacks or want to learn more about nutritional benefits, check out resources like Nutrition.gov or Healthline.
FAQs about No Bake Peanut Butter Granola Cups
How long do the granola cups last?
Your adorable no bake peanut butter granola cups can be stored in the fridge for about a week. If you're looking for longer shelf life, they freeze beautifully for up to a month! Just make sure to keep them in an airtight container to maintain their delicious texture and flavor.
Can I substitute the sweeteners?
Absolutely! While honey brings a delightful sweetness, you can easily swap it out for maple syrup or agave nectar, depending on your preference. Remember, if you’re using a different liquid sweetener, you may need to adjust the quantity to achieve your desired stickiness.
Are there alternatives for the toppings?
Yes! If dark chocolate isn't your thing, you can use white chocolate, yogurt coating, or even omit the topping altogether for a simpler treat. Additionally, feel free to sprinkle chia seeds, shredded coconut, or dried fruits for added texture and taste. The possibilities are endless!
For more ideas on customizing your treats, check out this resource on healthy toppings.
Conclusion on No Bake Peanut Butter Granola Cups
No bake peanut butter granola cups are a delightful way to satisfy your sweet tooth while enjoying a nutritious snack. With minimal prep time and no baking required, they’re perfect for busy lifestyles. Customize them with your favorite toppings, and keep them handy for an easy energy boost!
No Bake Peanut Butter Granola Cups
Equipment
- Cupcake pan
Ingredients
Granola Base
- 2 ½ cups granola
- 1 cup chopped peanuts
- 3 tablespoons peanut butter
- 3 tablespoons honey or more if needed
Filling and Topping
- 1 cup melted peanut butter for filling
- 12 oz. finely chopped dark chocolate for topping
- 1 tablespoon coconut oil for topping
Instructions
Preparation
- In a bowl, combine granola, chopped peanuts, peanut butter, and honey. If the mixture is too dry, add more honey to achieve a sticky consistency.
- Grease a cupcake pan and divide the mixture into 12 cups. Press the mixture firmly to hold together and create a dent in the center of each cup.
- Freeze for 5-10 minutes until the cups are firm.
- Melt the peanut butter and pour it into the center of each granola cup. Freeze for another 5-10 minutes until firm.
- Melt the dark chocolate and coconut oil together and spoon the melted chocolate on top of the peanut butter. Chill until the chocolate has set.
- Store in the fridge in an airtight container, or freeze for longer storage.
Leave a Reply