
Introduction to Baked Japanese Cheesecake
Why Baked Japanese Cheesecake is a Must-Try
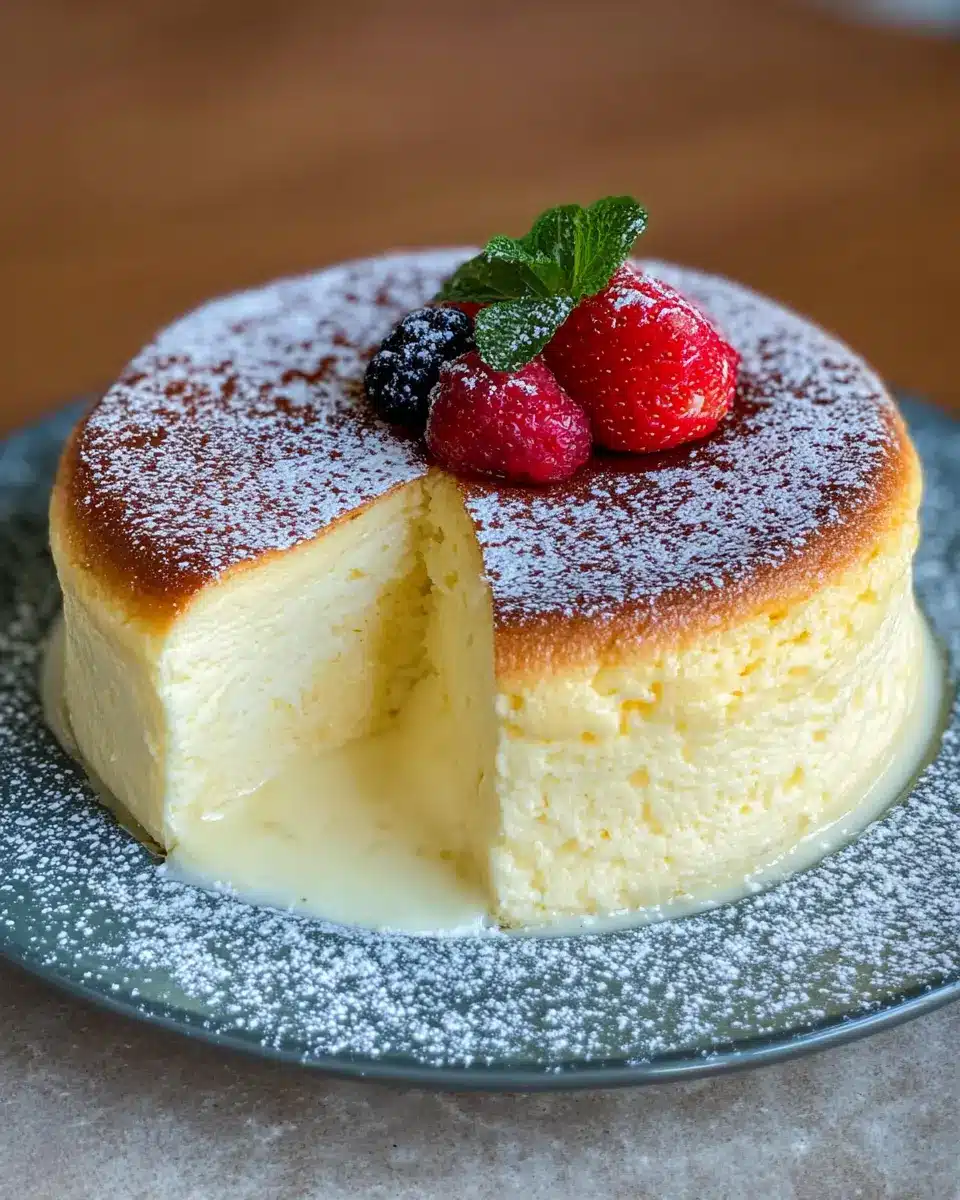
If you haven't had the pleasure of indulging in a baked Japanese cheesecake, you're in for a delightful treat. This unique dessert stands out for its light, airy texture and subtle sweetness, making it a perfect end to any meal or a charming afternoon snack. Unlike traditional cheesecakes, which can feel heavy and dense, the baked Japanese cheesecake offers a fluffy bite that feels like you're enjoying a cloud of creamy goodness.
This lightness comes from the technique of folding stiff egg white meringue into the batter, which creates that signature soufflé-like rise. It’s a great way to impress guests at dinner parties or simply to enjoy as a cozy treat at home. Plus, it pairs beautifully with fresh fruits and whipped cream, allowing you to customize it to your palate's liking.
For the adventurous cook, our baked Japanese cheesecake recipe is also quite forgiving. Not only can you play with flavors—like adding matcha or chocolate—but you can also make it gluten-free by substituting all-purpose flour with rice flour. Trust me, once you serve this luscious cake, you'll be getting requests for the recipe left and right!
Ready to dive into this delectable treat? Let’s get started!
Ingredients for Baked Japanese Cheesecake
Essential Ingredients Overview
Creating a delightful Baked Japanese Cheesecake requires a few essential ingredients that come together to form a light and fluffy texture, making it a popular dessert choice. Here’s what you’ll need:
- Egg Whites (5): The key to achieving that airy structure; use fresh eggs for the best results.
- Cream Cheese (8 oz): Choose a high-quality cream cheese as it forms the base of the cake.
- Butter (¼ cup): Adds richness and depth of flavor.
- Milk (½ cup): This keeps the batter smooth and contributes to moisture.
- Sugar (¾ cup total): A mix of fine and granulated sugar sweetens the cake beautifully.
- Flour & Cornstarch: They lend structure while preserving that desirable fluffiness—consider using gluten-free options like rice flour.
For a Baked Japanese Cheesecake Recipe, ensure you have these foundational ingredients on hand.
Optional Flavor Variations
A standard Baked Japanese Cheesecake is divine on its own, but why not elevate it? Here are some fun flavor variations you might enjoy:
- Matcha Powder: Add 2 tablespoons for a unique green tea flavor.
- Cocoa Powder: Want chocolate? Mix in 2 tablespoons for a rich twist.
- Citrus Zest or Juice: Lemon or orange will add a refreshing zing.
- Vanilla Extract: This classic addition enhances sweetness and aroma.
Feel free to play around with these flavors to create a cheesecake that’s uniquely yours!
For more on baking techniques, explore resources like The Kitchn for expert tips. Happy baking!
Step-by-Step Preparation of Baked Japanese Cheesecake
Creating a fluffy, light baked Japanese cheesecake is a joyous experience that combines technique with a sprinkle of love. Let’s bring those delicious layers together, step by step.
Separate the Eggs
Start by carefully separating 5 eggs. You’ll want the egg whites and yolks in their own bowls to prevent any yolk from interfering with the whipping process. Make sure there’s no yolk in the whites, as this will affect how well they whip up into those lovely stiff peaks. The egg whites will give your cheesecake its airy texture, making them a crucial component of this baked Japanese cheesecake recipe.
Make the Cake Batter
In a pot over low heat, melt together 8 oz of cream cheese, ¼ cup of butter, and ¼ cup of fine sugar until smooth. Once melted, remove from heat and gently fold in the 5 egg yolks until fully incorporated. Add the ¼ cup milk, and optionally, some vanilla extract or a splash of lemon juice for extra flavor. Finally, sift and stir in 2 tablespoons of cornstarch and ¼ cup of flour—this step helps eliminate clumps and gives your cake a silky batter.
Prepare the Egg White Meringue
Now it’s time to focus on those egg whites. Using a mixer, beat the egg whites on medium speed until foamy. Gradually add ¼ teaspoon of cream of tartar (or lemon juice) and then the ¼ cup of fine sugar. Continue beating on high until you achieve stiff peaks—a crucial moment for airy cheesecake. If you’re new to this, don’t worry; patience is key here! For more tips, check out this guide on how to whip egg whites correctly.
Combine Batters Carefully
Now comes the fun part: folding the batter and meringue together! Start by adding a scoop of meringue into the batter to lighten it. Gently fold in the rest of the meringue in two additional batches, using a spatula to maintain airiness. Overmixing can lead to a denser cake, so be gentle!
Preheat and Prepare Baking Pans
Preheat your oven to 330°F and prepare a water bath (bain-marie). This method helps to create steam, preserving moisture. Choose your baking pans—you can go for one 8-inch or two 6-inch pans. Line them with parchment paper for easy release later on.
Bake the Cheesecake
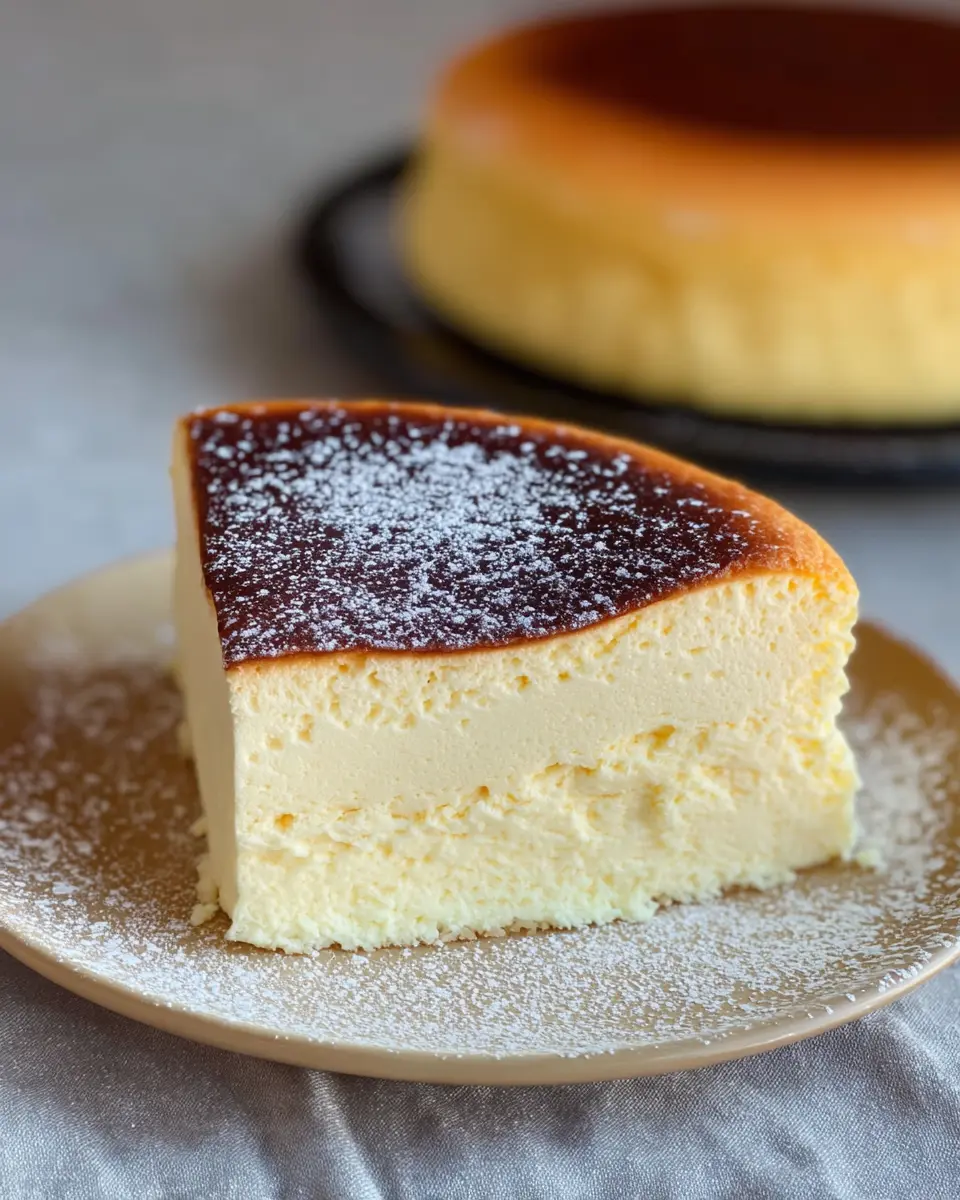
Pour the mixed batter into the baking pans and place them in the prepared water bath in the oven. Bake for 25 minutes at 330°F—watch your cake rise and get a lovely golden hue! After this initial baking, crack the oven door for about 10 seconds and reduce the temperature to 245-265°F, baking for an additional 45 minutes. This step is vital to prevent cracking and ensure a perfect texture.
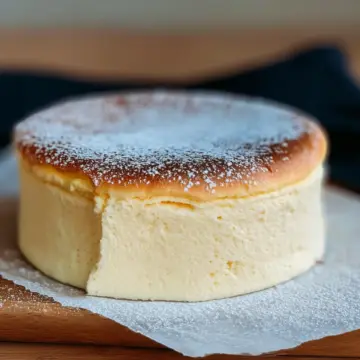
Let the cheesecake cool slightly in the oven before removing it. Flip it out and voilà—your masterpiece is ready to be adorned with toppings like strawberries or a dusting of confectioner’s sugar.
Now go ahead and enjoy that delightful texture and flavor of your homemade baked Japanese cheesecake!
Variations on Baked Japanese Cheesecake
Matcha Baked Japanese Cheesecake
For a delightful twist, try adding matcha to your baked Japanese cheesecake recipe. Simply blend 2 tablespoons of high-quality matcha powder into the cake batter during the mixing stage for a vibrant green hue and unique flavor. The earthy, slightly bittersweet notes of matcha pair beautifully with the lightness of the cheesecake, making it a favorite among green tea lovers. Don't forget to top it with some red bean paste or a sprinkle of matcha powder for an authentic experience!
Chocolate Baked Japanese Cheesecake
If you’re a chocolate enthusiast, a chocolate baked Japanese cheesecake is a must-try! Incorporate 2 tablespoons of cocoa powder into the egg yolk batter for a rich chocolatey taste. It’s a perfect way to satisfy your sweet tooth while still enjoying the fluffy and airy texture of traditional cheesecake. Pair it with fresh berries or whipped cream to enhance the dessert’s appeal. Both these variations elevate your baking game and impress friends at gatherings!
For more flavor ideas and variations, check out serious eats for additional inspiration!
Cooking Tips and Notes for Baked Japanese Cheesecake
Tips for Achieving the Perfect Texture
To ensure your baked Japanese cheesecake has that dreamy, fluffy texture, focus on whipping the egg whites to stiff peaks without overbeating. Gradually incorporate the sugar once they start foaming—it will yield a light and airy meringue. When mixing the batter, use gentle folding techniques to keep that airiness intact. If you're feeling adventurous, add a tablespoon of matcha or cocoa powder for a flavorful twist, but remember that simplicity often shines.
Common Mistakes to Avoid
A few pitfalls can derail your cheesecake dreams. First, avoid opening the oven door too soon—the sudden temperature drop can cause it to deflate. Also, don't skip the bain-marie method, as it provides gentle steam to prevent cracking. Lastly, ensuring your ingredients are at room temperature will combine better, creating a smooth batter that bakes evenly.
Ready to dive in? You can check out this tutorial for more visual guidance!
Serving Suggestions for Baked Japanese Cheesecake
Ideal Toppings and Accompaniments
When it comes to enhancing your baked Japanese cheesecake recipe, the possibilities are delightful! Fresh strawberries, a sprinkle of powdered sugar, or a drizzle of honey can elevate the creamy goodness of your cheesecake. For a unique twist, consider matcha powder or a handful of your favorite fruits, like raspberries or mangoes, for a refreshing contrast.
Best Ways to Serve and Enjoy
Enjoy your cheesecake warm for a comforting experience, or chill it for a refreshing dessert. Pair it with a cup of green tea or coffee for a delicious complement. For a little flair, serve with whipped cream or a side of vanilla ice cream. The texture and flavor are simply irresistible—invite your friends over, share some stories, and indulge in this light yet rich treat together.
For more serving ideas, check out this cheesecake serving guide that highlights other delightful pairings!
Time Breakdown for Baked Japanese Cheesecake
Preparation Time
Gathering your ingredients and prepping the cake will take about 30 minutes. This includes separating eggs, melting cream cheese and butter, and beating the egg whites into stiff peaks.
Baking Time
Once the batter is ready, the baking process takes approximately 1 hour and 10 minutes. This includes the initial high-heat bake and then the longer, gentle bake.
Total Time
In total, you're looking at approximately 1 hour and 40 minutes from start to finish. Perfect to schedule around a cozy evening at home! For more detailed instructions, check out our full baked Japanese cheesecake recipe.
Whether you're a baking novice or a seasoned pro, this cheesecake's delicate flavor and airy texture make it worth the time investment. The result? A delightful dessert sure to impress your friends and family!
Ready to dive in? Let’s get baking! For more tips on mastering the perfect cheesecake, visit BBC Good Food or King Arthur Baking.
Nutritional Facts for Baked Japanese Cheesecake
Calories
A typical slice of baked Japanese cheesecake contains approximately 250 calories. It's indulgent but balanced, making it a delightful treat rather than an everyday dessert.
Protein
With about 7 grams of protein per slice, this cheesecake can be a satisfying option, especially due to the combination of eggs and cream cheese. Protein is essential for muscle repair, making this a slightly guilt-free dessert.
Sugar
Each slice has around 15 grams of sugar, striking a fair balance between sweetness and savoriness. Considering most desserts are loaded with sugar, this recipe keeps it reasonable, allowing for that delightful cheesecake experience without overwhelming sweetness.
For more insights on ingredient benefits, you may want to explore NutritionData or Healthline. Both are excellent resources for understanding the nutritional profile of your favorite ingredients!
FAQs about Baked Japanese Cheesecake
How do I know when my cheesecake is done?
The best way to determine if your baked Japanese cheesecake recipe is finished is to keep an eye on its texture and the edges. After the initial baking time, the cheesecake should rise beautifully and have a slight jiggle in the center. If you insert a toothpick into the cake, it should come out mostly clean, with just a few moist crumbs attached. Remember, the cheesecake will continue to cook a bit after you remove it from the oven, so don’t over-bake!
Can I make this cheesecake gluten-free?
Absolutely! You can easily adapt this recipe to be gluten-free by replacing all-purpose flour with sweet rice flour, or Mochiko. Just be sure to double-check that your baking powder and cornstarch are also gluten-free.
What’s the best way to store leftovers?
If you have any leftovers (which might be rare given how delicious this cheesecake is), store them in an airtight container in the refrigerator. Enjoy them within 3-4 days for the best flavor. You can also freeze pieces for longer storage—just wrap them tightly in plastic wrap and aluminum foil. They’ll stay fresh for about a month!
Conclusion on Baked Japanese Cheesecake
In summary, this baked Japanese cheesecake recipe offers a delightful balance of fluffiness and creaminess that is sure to impress. Whether you're hosting friends or indulging yourself, this cake is a conversation starter. Don’t hesitate to experiment with flavors or toppings; the options are endless! Enjoy your baking!
Baked Japanese Cheesecake Recipe
Equipment
- Mixer
- Bain-marie
- Baking pan
- parchment paper
Ingredients
Egg White Meringue (Stiff Peaks)
- 5 large egg whites
- ¼ teaspoon cream of tartar or vinegar or lemon juice
- ¼ cup fine sugar Not Confectioner sugar
Cake Batter
- 5 large egg yolks
- 8 oz cream cheese 1 bar
- ¼ cup butter
- ½ cup milk
- ¼ cup fine sugar
- 2 tablespoons corn starch (magic ingredient)
- ¼ cup flour (use rice flour or Mochiko for gluten-free)
Optional Toppings
- strawberries
- confectioner sugar
- fruits of your choice
- honey
- matcha powder
Instructions
Preparation
- Separate 5 beautiful eggs. Place the egg yolks in a bowl, and the egg whites in a mixer bowl.
- Place the butter, cream cheese and ¼ cup of fine sugar into a pot over low heat. Allow the ingredients to melt, and mix together into a beautifully smooth batter mixture.
- Remove the pot from heat, and add the egg yolks into the batter mixture. Mix well, but gently.
- Add the cornstarch and flour. Once again, mix well. Clumps should disappear.
- Add milk and optionally vanilla extract or other flavors of your choice.
- Mix well. The batter should be smooth and liquid-y.
- Set aside the batter as you beat the egg whites into stiff peaks.
- Preheat oven to 330F. Prepare a bain-marie by putting water in a deep rectangular baking pan or dish.
- Prepare baking pans— you can bake one 8-inch cake or two 6-inch cakes. Line the bottoms with circular parchment paper.
- Once you achieve stiff peaks, place some beaten egg white into the batter and mix together.
- Repeat the above step two more times.
- Pour the batter into the rest of the egg whites using folding techniques.
- Pour the well-incorporated batter into the baking pan(s).
- Bake bain-marie style for 25 minutes at 330F.
- After 25 minutes, check if the cake has risen, if not keep adjusting the temperature.
- Allow your cake to rest in the oven after baking for about 10 minutes.
- Remove from the oven and flip the cake over to remove it from the pan.
- Now place another plate on top of the cake and flip it again carefully.
- Serve when still warm, or chill in the fridge.


Leave a Reply