
Introduction to Artisan Bread
If you've ever experienced the joy of tearing into a freshly baked loaf of artisan bread, you know just how special it is. But why choose to make homemade artisan bread? For starters, the aroma that fills your kitchen as it rises and bakes is unbeatable. Making bread at home allows you to control the ingredients, ensuring you’re using only the finest, natural components without any unwanted preservatives. If you’ve ever glanced at the ingredient list on store-bought bread, you may have been surprised to see ingredients you can’t even pronounce!
Homemade artisan bread is also wonderfully versatile. You can experiment with different toppings, spices, and flavors. Feel like adding some cheese, herbs, or even nuts? Go for it! According to experts at King Arthur Flour, using high-quality ingredients can significantly enhance your baking experience. Plus, there’s a real sense of accomplishment in creating something from scratch.
With a simple artisan bread recipe, you can master the art of bread-making with little effort and minimal ingredients. In just a few hours, you can delight in warm, crusty loaves that are perfect for any meal or occasion. So, why not roll up your sleeves and dive into the world of homemade artisan bread? Your taste buds will thank you!
Ingredients for Artisan Bread
Creating a fantastic artisan bread recipe begins with selecting the right ingredients. Let’s break it down for you!
-
Bread Flour: Using 3 and ¼ cups (about 430g) of bread flour is crucial. This gives the bread its desirable chewy texture. For proper measurement, be sure to spoon and level the flour.
-
Instant Yeast: Two teaspoons (about 6g) of instant yeast gives your dough the lift it needs. This type of yeast is a favorite because it activates quickly and reliably.
-
Coarse Salt: Use 2 teaspoons (about 9g) of coarse salt for flavor. It enhances the overall taste of your bread, leading to a satisfying crunch and rich flavor.
-
Water: 1 and ½ cups (360ml) of water should be close to room temperature (about 70°F or 21°C). Too hot, and you might kill the yeast!
-
Optional Cornmeal: If you want a little extra texture and that charming bakery vibe, consider using cornmeal for dusting the pan.
Getting these ingredients right sets the foundation for a bread that you’ll want to share with friends and family. Enjoy the process, and remember, great cooking often starts with great ingredients!
Preparing Artisan Bread
Making artisan bread at home is a delightful experience that fills your kitchen with the warm, mouthwatering aroma of freshly baked bread. With just a few simple steps, you can create a beautiful loaf that's perfect for sandwiches, brunch, or just slathered with butter. Let’s dive into the process.
Combine the Dry Ingredients
Start by gathering your ingredients: 3 and ¼ cups of bread flour, 2 teaspoons of instant yeast, and 2 teaspoons of coarse salt. In a large, ungreased mixing bowl, whisk these dry ingredients together until they are well combined. This step is essential because it ensures that the yeast is evenly distributed, allowing for a better rise in your bread.
Mix in the Water
Now, it’s time to incorporate the liquid! Pour in 1 and ½ cups of water that's close to room temperature (about 70°F or 21°C). Using a silicone spatula or wooden spoon, gently mix until all the flour is moistened. Don’t worry if the dough looks shaggy and sticky; this is normal. You may even choose to use your hands to bring everything together. This tactile engagement is one of the joys of baking!
Allow the Dough to Rise
Cover the mixing bowl tightly with plastic wrap or aluminum foil, and let it sit at room temperature for 2 to 3 hours. During this time, the dough will nearly double in size, with lots of lovely air bubbles forming inside. For an even deeper flavor, consider letting it rest in the refrigerator for anywhere from 12 hours to 3 days. It’s worth the wait!
Shape the Loaves
When you're ready to continue, lightly dust a large nonstick baking sheet with flour or cornmeal. Gently turn the cold dough out onto a floured work surface and, using a sharp knife or bench scraper, divide it into two halves. Shape each half into long loaves, roughly 9x3 inches, and place them on the baking sheet with room in between. Loosely cover them and let them rest for 45 minutes while you prepare for the next step.
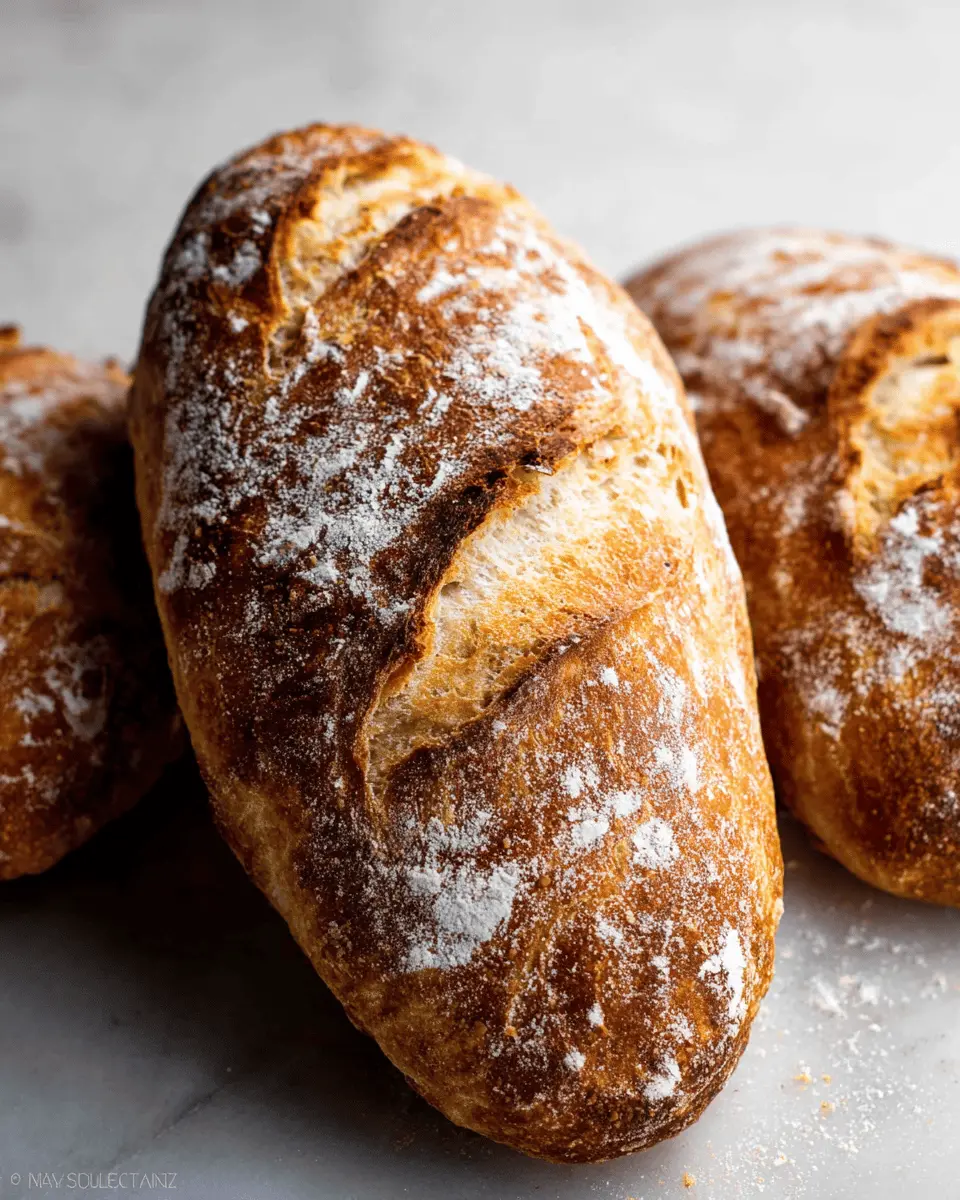
Preheat the Oven and Score the Dough
While the dough is resting, preheat your oven to 475°F (246°C). Scoring helps your bread expand during baking. Using a very sharp knife or bread lame, make three shallow slashes on top of each loaf, about ½ inch deep. This step not only adds visual appeal but also aids in creating a crusty exterior.
Bake the Bread to Perfection
Place your shaped and scored loaves in your preheated oven for 20-25 minutes, or until the crust is beautifully golden brown. To ensure that your bread is fully cooked, tap the bottom of each loaf—you should hear a hollow sound. For an extra crispy crust, consider placing a shallow pan of boiling water on the bottom rack of the oven to create steam during baking.
Once done, allow the bread to cool for at least 20 minutes before slicing. This helps the interior set properly, giving you that perfect texture. Enjoy the satisfaction of baking your very own artisan bread and impress your friends and family with your skills!
Exploring the world of baking is both a journey and a treat! Don’t hesitate to experiment with the flavors by adding herbs or cheeses to your next loaf. For more tips on baking and perfecting your artisan bread recipe, check out expert resources like King Arthur Flour to skyrocket your skills even further!

Variations on Artisan Bread
Herbed Artisan Bread
Why stick to plain when you can elevate your artisan bread recipe with herbs? Adding fresh or dried herbs like rosemary, thyme, or basil can transform the flavor. Simply toss in about three tablespoons of your chosen herbs to the dry ingredients before adding the water. The result is a fragrant, flavorful loaf perfect for sandwiches or as an impressive addition to your dinner table.
Cheese-Stuffed Artisan Bread
For a delightful twist, consider a cheese-stuffed artisan bread. After shaping your dough, roll it out to a rectangle, sprinkle shredded cheese (like mozzarella or your favorite blend), and fold it over to enclose the filling. Shape it back into a loaf and follow the baking instructions. The cheesy surprise in every slice is sure to be a hit, making your bread not just a side, but the star of the meal!
For more inspiration, check out King Arthur Baking for tips on adding flavors to your bread!
Baking Notes for Artisan Bread
When diving into this artisan bread recipe, a few baking notes can elevate your results and make the process smoother.
- Room Temperature: Aim for about 70°F (21°C) water; this helps the yeast activate without getting too aggressive.
- Patience is Key: While you can rush the rise, a longer stay in the fridge (12-72 hours) significantly enhances flavor and texture.
- Shape Matters: Whether you prefer loaves or boules, just ensure even shaping for consistent baking.
- Steam for Crispiness: For that golden, crunchy crust, don’t skip the boiling water step.
Feel free to explore variations, from added herbs to unique toppings, to truly make this bread your own! For more details on specific ingredients and techniques, check out Sally's Baking Addiction.

Serving Suggestions for Artisan Bread
Your freshly baked artisan bread recipe is more than just a loaf; it's a canvas for delicious toppings and pairings! Here are some ideas to elevate your bread experience:
- Classic Pairings: Spread a layer of rich, creamy butter or tangy cream cheese for a simple yet satisfying taste.
- Savory Additions: Top with sliced chicken ham and fresh arugula for a delightful sandwich. Or, layer on turkey bacon with ripe avocado and a sprinkle of salt for a heartier option.
- Sweet Treats: Enjoy it with a drizzle of honey or a dash of jam, complemented by a side of Greek yogurt for dipping.
- Salads on the Side: Pair with a vibrant salad, like a lemony quinoa or a fresh caprese.
These ideas are tasty, simple, and perfect for any meal—breakfast, lunch, or dinner!
Tips for making perfect Artisan Bread
Achieving the ideal artisan bread recipe can feel like an art form, but these simple tips will help you master it.
- Use Quality Ingredients: High protein bread flour is crucial for that chewy texture. If possible, choose organic options for an added flavor boost.
- Temperature Matters: Keep your water around 70°F (21°C) to help yeast perform its magic.
- Patience is Key: Allow your dough to rise slowly in the fridge for better flavor. An overnight rest is worth it!
- Score Thoughtfully: Scoring allows the bread to expand in the oven. Aim for 3 shallow cuts to create a beautiful crust.
For a step-by-step guide on baking bread, you might find this resource helpful: King Arthur Baking. Happy baking!
Time Breakdown for Artisan Bread
Preparation Time
The active preparation time for this artisan bread recipe is around 15-20 minutes. During this time, you’ll mix the ingredients and shape the dough, entering the delicious world of bread making.
Rising Time
For the best flavor, allow the dough to rise for 2-3 hours at room temperature. If you're feeling adventurous, let it rest in the fridge for 12 hours to up to 3 days! This extended rise develops incredible taste and texture.
Baking Time
Once your dough has risen perfectly, the baking process requires just about 20-25 minutes. Keep a close watch until you see that golden-brown crust forming—it’s the ideal signal of readiness!
Total Time
In total, the overall time commitment for this artisan bread recipe can stretch from around 2 hours and 35 minutes to 3 days (if refrigerating for extended flavor). But don’t worry, most of that time is spent letting the dough do its magic!
Baking your own bread can be incredibly rewarding. Don’t forget to savor the incredible aroma that fills your kitchen as it bakes! If you'd like to learn more about bread baking techniques, check out this resource from King Arthur Baking.
Nutritional Facts for Artisan Bread
Understanding the nutritional profile of your homemade artisan bread recipe is key to enjoying it mindfully. Each serving (2 slices) contains approximately:
- Calories: 136
- Protein Content: 4.7 g, making this bread a solid choice for a protein boost.
- Sodium Levels: 389.8 mg, which is moderate and manageable within a balanced diet.
This bread is not just delicious but also contributes to your daily nutrition. Embrace the wholesome goodness with each slice!
For more about bread nutrition, check out Healthline's guide on choosing the best options for your health goals.
FAQs about Artisan Bread
Can I use all-purpose flour instead of bread flour?
Absolutely! While bread flour is ideal for achieving that chewy texture and crispy crust in an artisan bread recipe, you can use all-purpose flour in a pinch. Just remember that the final texture might be slightly different—still delicious but a bit softer.
How do I know when my bread is done baking?
A crucial aspect of baking artisan bread is knowing when it’s just right. You'll want to look for a golden-brown crust and a hollow sound when you tap the bottom of the loaf. For the best results, use an instant-read thermometer; your bread is perfectly baked when it reaches 195°F (90°C).
Can I freeze artisan bread?
Yes, you can! Freezing artisan bread is a great way to enjoy it later. After baking, let it cool completely. Then, wrap it tightly in plastic wrap and aluminum foil, or place it in a freezer-friendly bag. It’ll stay fresh for up to three months. Just remember to thaw it at room temperature before slicing!
For more tips on bread storage and recipe adjustments, check out resources like King Arthur Baking.
Conclusion on Artisan Bread
In summary, this artisan bread recipe offers a simple yet rewarding way to create your own homemade bread. With a little patience and the right ingredients, you’ll enjoy the delightful aroma and taste of freshly baked bread. Give it a try, and savor the satisfaction of baking something delicious!

Artisan Bread Recipe
Equipment
- mixing bowl
- Silicone Spatula
- baking sheet
- Sharp Knife
- Instant-Read Thermometer
Ingredients
- 3 cups bread flour spooned & leveled
- 2 teaspoons instant yeast
- 2 teaspoons coarse salt see note
- 1.5 cups water close to room temperature at about 70°F (21°C)
- cornmeal for dusting pan (optional)
Instructions
Preparation
- In a large ungreased mixing bowl, whisk the flour, yeast, and salt together. Pour in the water and gently mix together with a silicone spatula or wooden spoon. The dough will seem dry and shaggy, but keep working it until all the flour is moistened. If needed, use your hands to work the dough ingredients together. The dough will be sticky. Shape into a ball in the bowl as best you can.
- Keeping the dough in the bowl, cover the dough tightly with plastic wrap or aluminum foil and set on the counter at room temperature. Allow to rise for 2-3 hours.
- For best flavor and texture, let the dough rest in the refrigerator for at least 12 hours and up to 3 days.
- Lightly dust a large nonstick baking sheet with flour and/or cornmeal. Turn the cold dough out onto a floured work surface. Using a sharp knife or bench scraper, cut dough in half. Place dough halves on prepared baking sheet. Shape into 2 long loaves about 9×3 inches each, about 3 inches apart. Loosely cover and allow to rest for 45 minutes.
- During this 45 minutes, preheat the oven to 475°F (246°C).
- Score the bread loaves with 3 slashes, about ½ inch deep. If the shaped loaves flattened out during the 45 minutes, use floured hands to narrow them out along the sides again.
- Optional: place a shallow metal or cast iron baking pan on the bottom oven rack and pour 3-4 cups of boiling water into it. Place the scored dough on a higher rack and quickly shut the oven.
- Place the shaped and scored dough in the preheated oven on the center rack. Bake for 20-25 minutes or until the crust is golden brown. Gently tap the loaves—if they sound hollow, the bread is done.
- Remove the bread from the oven and allow to cool for at least 20 minutes before slicing and serving.


Leave a Reply