
Introduction to Banana Pudding Cheesecake
If you're in the mood for a dessert that marries the creamy goodness of cheesecake with the nostalgic flavors of banana pudding, then look no further than this delightful Banana Pudding Cheesecake. It’s a sweet, irresistible treat that brings back memories of family gatherings and summer picnics, making it a perfect addition to any dessert table.
Why Banana Pudding Cheesecake is a Must-Try for Homemade Desserts
Imagine biting into a slice of this cheesecake—smooth, rich, and infused with mashed ripe bananas, all nestled in a buttery Nilla wafer crust. You're not just enjoying a dessert; you're experiencing layers of flavor that unfold with each bite! This cheesecake offers a textural contrast that's simply divine: the crunch of the crust paired with the creaminess of the filling transports you back to carefree days spent enjoying smooth, chilled banana pudding.
Furthermore, making a banana pudding cheesecake at home is incredibly satisfying. You get to control the ingredients and customize it to your liking. Whether you savor it plain or dress it up with whipped cream and fresh banana slices, this dessert is sure to impress. Plus, it's an excellent conversation starter—who doesn't love a good slice of nostalgia? Not to mention, it could become a new tradition in your home!
For more inspiration, check out delectable banana recipes, like this banana bread or banana smoothies, to elevate your baking repertoire.
Ingredients for Banana Pudding Cheesecake
When you're ready to craft a delightful banana pudding cheesecake, having the right ingredients is essential. Let's break it down into three easy sections!
Essential Ingredients for the Nilla Wafer Crust
To create a flavorful and buttery crust, you'll need:
- 3 cups whole Nilla wafers (about 180 grams)
- ¼ cup granulated sugar (50 grams)
- 5 tablespoons unsalted butter, melted (70 grams)
These simple ingredients combine to give your cheesecake a delicious foundation that complements the creamy filling.
Key Components for the Banana Pudding Cheesecake Filling
The filling is where the magic happens! Here’s what you’ll need:
- 32 ounces brick-style cream cheese, softened (4 blocks; 905 grams)
- 1 cup mashed ripe banana (approximately 2 large bananas; 250 grams)
- ½ cup full-fat sour cream (115 grams)
- 1 cup granulated sugar (200 grams)
- 1 (3.4 oz) box of dry instant banana cream pudding mix
- 1 teaspoon pure vanilla extract
- 4 large eggs, at room temperature
These key components blend together to create a rich, banana-infused cheesecake experience.
Optional Toppings to Elevate Your Cheesecake
Take your banana pudding cheesecake to the next level with these optional toppings:
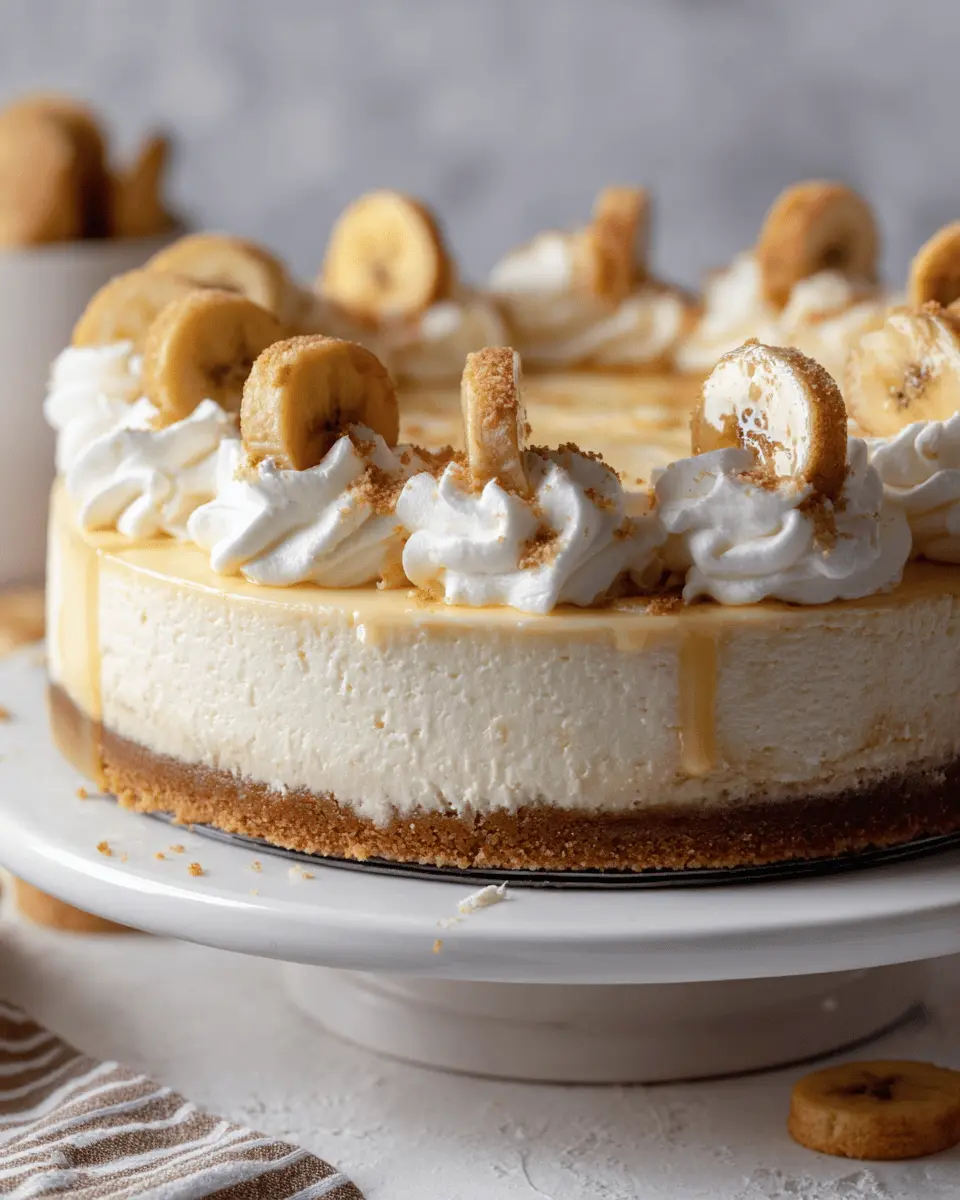
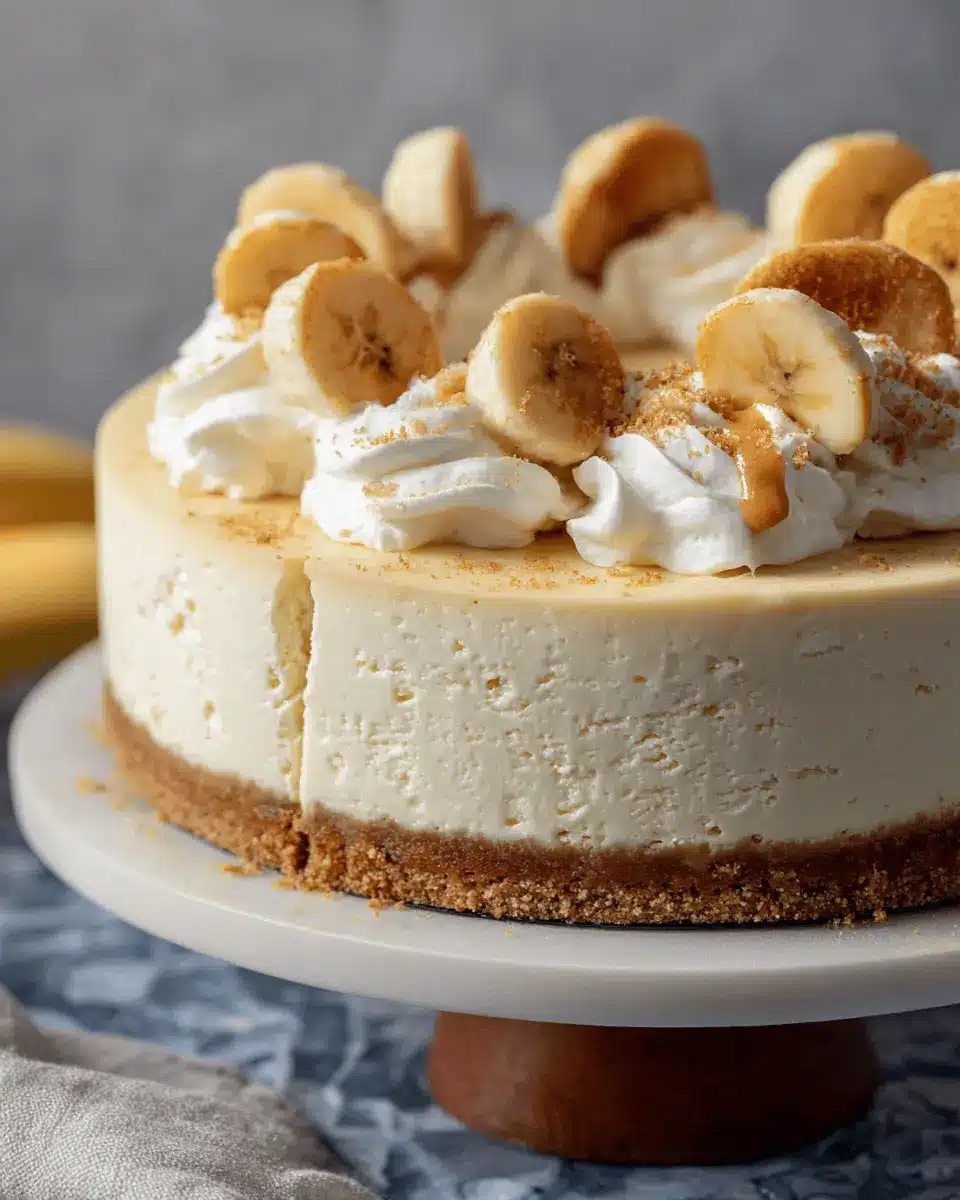
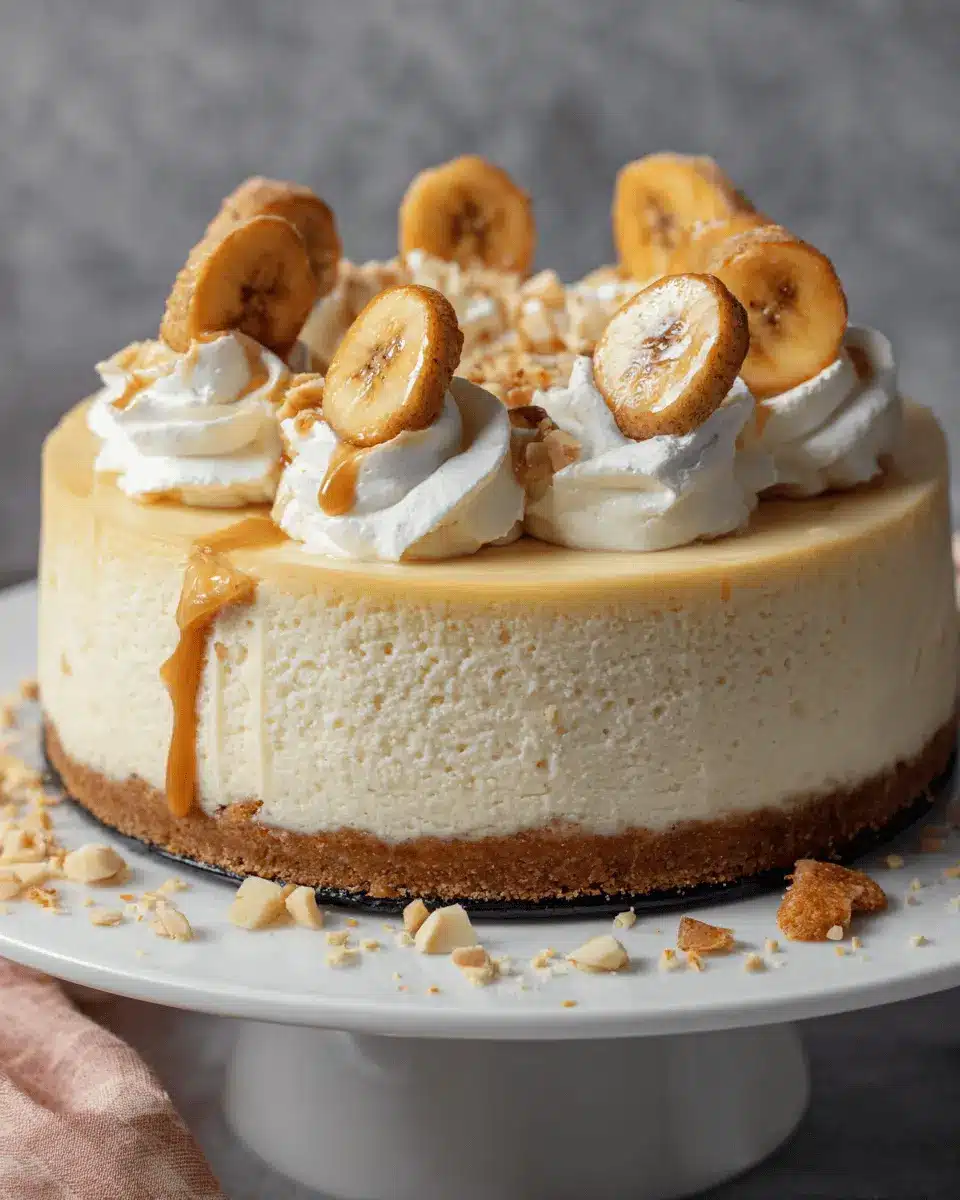
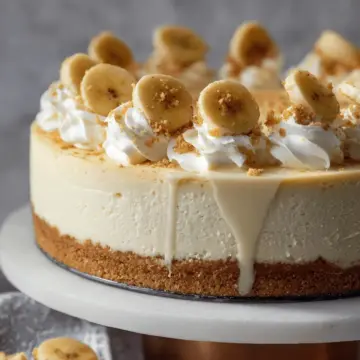
- 2 cups whipped cream (store-bought or homemade)
- 1 to 2 bananas, sliced for freshness
- 10 to 20 Nilla wafers for added crunch
These toppings not only enhance the flavor but also add beautiful texture and visual appeal! Happy baking!
Preparing Banana Pudding Cheesecake
Making a banana pudding cheesecake is not as daunting as it sounds! With each step, you’ll see how easy it is to create this decadent dessert that will leave your friends and family begging for more. Let’s jump right in and get your kitchen ready!
Preheat and Prepare the Crust
Start by preheating your oven to 325°F (163°C). This is the perfect temperature for baking your cheesecake. While that’s warming up, it’s time to prepare your springform pan. Line the bottom with parchment paper — this will prevent any sticking later on and make it easier to serve your cheesecake. Set the pan aside as you move on to the next step.
Making the Nilla Wafer Crust
The crust is where your cheesecake gets a delightful crunch! In a medium-sized mixing bowl, combine 3 cups of crushed Nilla wafers with ¼ cup of granulated sugar. This combo gives your crust its signature sweetness. Once mixed, melt 5 tablespoons of unsalted butter and pour it into the bowl. Stir everything together until the crumbs are evenly moistened. Scoop this mixture into your prepared springform pan and press it firmly into an even layer. Bake it for 10 minutes, then let it cool while you whip up the filling. Keeping the oven at the same temperature will ensure a consistent environment for your cheesecake.
Combining the Cheesecake Filling Ingredients
Now comes the fun part: the filling! Before you start, bring a large pot of water to a boil on the stove for the water bath. In a mixing bowl, beat 32 ounces of softened cream cheese until it’s nice and smooth. Then add 1 cup of mashed bananas (about 2 ripe bananas) and ½ cup of sour cream. Mix them until fully combined. Next, add in 1 cup of granulated sugar, a 3.4 oz box of instant banana cream pudding mix, and 1 teaspoon of vanilla extract. Beat again until everything is perfectly blended. Finally, gently mix in 4 large eggs, being careful not to beat too hard to maintain that fluffy texture.
Baking with the Water Bath Method
To achieve the perfect banana pudding cheesecake, use the water bath method. Wrap the bottom of your springform pan with aluminum foil, ensuring it’s secure, then place it inside an oven bag. This clever trick prevents water from seeping in! Pour your cheesecake mixture into the pan and smooth the top. Place the pan into a roasting pan, then carefully add boiling water until it’s about 1 inch deep. Bake for 70 to 80 minutes. The edges should be set, while the center remains a little wobbly.
Cooling and Chilling the Cheesecake
After baking, turn off the oven and leave the door slightly ajar. Let your cheesecake cool in this warm environment for 1 hour. This gradual cooling helps prevent cracking. Once it’s cool, transfer the springform pan to a wire rack until it cools completely. After that, wrap it tightly and place it in the refrigerator to chill for 5 to 6 hours, or better yet, overnight if you can resist! This chilling period is crucial for achieving that perfect creamy texture.
And there you have it! After some time in the fridge, your banana pudding cheesecake will be ready to decorate and enjoy. Happy baking! 🥳
Variations on Banana Pudding Cheesecake
Add a Chocolate Twist
If you love the combination of chocolate and bananas, consider adding a rich chocolate layer to your banana pudding cheesecake. Simply melt some dark chocolate and swirl it into the cheesecake mixture before baking, or create a chocolate ganache to pour over the top after it's cooled. This addition not only enhances the flavor but also adds a beautiful contrast, making your dessert as visually stunning as it is delicious!
Make it a Layered Dessert
For a fun and elegant presentation, turn your banana pudding cheesecake into a layered dessert. Instead of baking it all in one pan, you can layer the crust, cheesecake filling, and bananas in individual cups or glasses. Alternate layers of crushed Nilla wafers, banana slices, and the creamy cheesecake filling for an eye-catching treat. This method allows guests to enjoy individual servings, making it perfect for parties or casual get-togethers. Check out this layered dessert guide for more ideas!
Experimenting with these variations not only adds a unique twist to your dessert but also keeps it fresh and exciting. What will you try first?
Essential Cooking Tips for Banana Pudding Cheesecake
How to Achieve a Smooth Filling
To create a silky banana pudding cheesecake filling, ensure your cream cheese is softened to room temperature—this helps avoid lumps. Use a stand mixer for a well-blended mixture, and keep the speed low to minimize air bubbles. Incorporate your mashed bananas gently; a rubber spatula is perfect for folding in ingredients without over-mixing. Check out this guide on the importance of room temperature ingredients for more tips!
Ensuring the Crust Holds Up
For a sturdy crust, ensure your crushed Nilla wafers are finely ground and well-moistened with melted butter. Press the mixture firmly into the springform pan to form an even layer, which helps it stay intact during baking. After baking, let it cool completely before adding the filling. This sets the crust, making it less likely to crumble when serving. Remember, a well-prepared crust is the foundation of a great cheesecake!
Serving suggestions for Banana Pudding Cheesecake
Creative plating ideas
Elevate your banana pudding cheesecake with charming plating! Slice the cheesecake into perfect squares and present them on a rustic wooden board, garnished with mint leaves for a dash of color. For a more sophisticated look, drizzle a store-bought or homemade caramel sauce over the top before adding a dollop of whipped cream. You might even layer individual servings in mason jars for a fun, dessert-in-a-jar experience that’s perfect for parties.
Perfect accompaniments for your cheesecake
To enhance your banana pudding cheesecake, consider a few delightful pairings:
- Fresh Fruits: Sliced strawberries or blueberries add a refreshing contrast.
- Beverages: Serve with a chilled glass of iced tea or a creamy cup of coffee to balance the rich flavors.
- Nuts: A sprinkling of crushed walnuts or pecans can introduce a nice crunch.
Explore these combinations to make your dessert experience truly unforgettable! Can't get enough banana? Don't miss these delicious banana recipes for more inspiration!
Time Breakdown for Banana Pudding Cheesecake
Preparation Time
Get ready for some deliciousness! The preparation time for your banana pudding cheesecake is approximately 30 minutes. This is when you'll whip up the crust and the cheesecake filling.
Baking Time
The baking magic happens for about 70 to 80 minutes. This step ensures your banana pudding cheesecake has that perfectly creamy texture while being set just right.
Chilling Time
After baking, allow your cheesecake to cool and then chill in the refrigerator for about 5 to 6 hours (or overnight for even better flavor!). This chilling time is essential for the cheesecake to set properly.
Total Time
In total, you're looking at around 6 to 7 hours from start to finish, including prep, baking, and chilling. It’s well worth the wait when you taste that creamy banana flavor combined with a crunchy Nilla wafer crust!
Crafting this delightful dessert doesn’t just satisfy your sweet tooth; it also makes for a fantastic centerpiece at your next gathering. Trust us, your friends and family will be begging for seconds!
Nutritional Facts for Banana Pudding Cheesecake
Calories per slice
Each slice of this banana pudding cheesecake contains approximately 350 calories. This makes it a decadent treat, perfect for those special occasions.
Protein content
In terms of nourishment, each slice provides about 6 grams of protein. While it’s not a full meal, it offers a delightful boost along with its creamy goodness.
Sugar levels
Be mindful, as a slice packs around 25 grams of sugar. If you're looking for lower sugar options, consider using a sugar substitute or reducing the amount of granulated sugar in the filling.
For more tips on enjoying desserts while being health-conscious, check out Healthline's guide.
FAQs about Banana Pudding Cheesecake
Can I make this cheesecake ahead of time?
Absolutely! The banana pudding cheesecake actually benefits from being made a day in advance. This gives the flavors time to meld beautifully. Just make sure to refrigerate it after cooling, and it'll be ready to impress your guests!
What’s the best way to store leftovers?
To keep your cheesecake fresh, cover it tightly with plastic wrap or aluminum foil and store it in the refrigerator. It should last for about 5 days—perfect for late-night snacks or unexpected dessert cravings. For longer storage, you can freeze individual slices wrapped in plastic wrap, then in foil. Just thaw overnight in the fridge before enjoying!
Can I substitute ingredients for dietary needs?
Definitely! You can use dairy-free cream cheese and yogurt for a vegan version. For a gluten-free crust, try using gluten-free cookie crumbs instead of Nilla wafers. Always feel free to adapt the banana pudding cheesecake according to your dietary preferences or restrictions. If you're looking for more substitutions, check out resources like Live Well Bake Often!
Conclusion on Banana Pudding Cheesecake
Celebrate homemade goodness with this delightful dessert
Banana pudding cheesecake is a celebration of flavor that'll impress your friends and family. With its creamy texture and nostalgic taste, it's perfect for gatherings or a cozy night in. Try making it from scratch, and discover the joy of homemade goodness. You'll never look back!
Banana Pudding Cheesecake
Equipment
- 9-inch springform pan
- food processor
- Stand Mixer
- mixing bowl
- roasting pan
- Aluminum Foil
Ingredients
Nilla Wafer Crust
- 3 cups whole Nilla wafers crushed 180 grams; 1 ⅔ cups crushed
- ¼ cup granulated sugar 50 grams
- 5 tablespoons unsalted butter melted and slightly cooled 70 grams
Banana Pudding Cheesecake Filling
- 32 ounces brick-style cream cheese softened to room temperature 4 blocks; 905 grams
- 1 cup mashed ripe banana 2 large ripe fresh bananas; 250 grams
- ½ cup full-fat sour cream room temperature 115 grams
- 1 cup granulated sugar 200 grams
- 1 box dry instant banana cream pudding mix (NOT cook & serve; 3.4 oz)
- 1 teaspoon pure vanilla extract
- 4 large eggs at room temperature
Optional Toppings
- 2 cups whipped cream or whipped topping [homemade or store-bought]
- 1 to 2 bananas sliced
- 10 to 20 units Nilla wafers
Instructions
Instructions
- Preheat the oven to 325°F (163°C).
- Line the bottom of a 9-inch springform pan with parchment paper. Set aside.
- Crush the Nilla wafers in a food processor or blender until the mixture resembles fine crumbs. Alternatively, you can place them in a sealed ziplock bag and crush them with a rolling pin.
- Combine the crushed Nilla wafer crumbs and granulated sugar in a medium-sized mixing bowl and stir until well combined. Add the melted butter and mix until all of the crumbs are moistened.
- Scoop the mixture into the prepared 9-inch springform pan and firmly press it down into one even layer.
- Bake for 10 minutes, then remove from the oven and set aside to cool while you make the filling. Keep the oven temperature at 325°F (163°C).
- Place a large pot of water on the stove to boil for the water bath before getting started with the filling.
- In the bowl of a stand mixer fitted with the paddle attachment, or in a large mixing bowl using a handheld mixer, beat the cream cheese on low-medium speed until smooth (about 1 to 2 minutes).
- Add the mashed banana and sour cream and mix until fully combined, stopping to scrape down the sides of the bowl as needed. Then, add the granulated sugar, banana cream pudding mix, and pure vanilla extract and mix until well combined (about 30 to 60 seconds).
- In a separate small mixing bowl, lightly beat the eggs. Add the beaten eggs to the mixing bowl with the cheesecake filling and mix on low speed until just combined. Use a rubber spatula to turn the filling a few times to make sure everything is fully mixed together. Set aside.
- Secure the bottom of the springform pan with 2 to 3 layers of aluminum foil to prevent water from entering the pan while baking. Place the wrapped springform pan in an oven bag and roll the sides down (this will ensure that no water gets into your pan!).
- Pour the cheesecake filling into the springform pan and smooth it out into one even layer.
- Add the boiling water you started before the filling to a large roasting pan until it is about 1-inch deep. Carefully place the wrapped springform pan into the roasting pan.
- Transfer the roasting pan with the cheesecake to the oven and bake for 70 to 80 minutes or until the edges of the cheesecake are set and the center is still slightly jiggly. Turn the oven off, crack the oven door slightly, and allow the cheesecake to cool in the warm oven for 1 hour.
- After the cheesecake has cooled for 1 hour in the oven, remove it from the oven and transfer to a wire rack to cool completely. Once cooled, cover tightly and transfer to the refrigerator to chill for 5 to 6 hours or overnight.
- Once the cheesecake is completely cooled and chilled, run a thin knife around the outside of the cheesecake to loosen it from the pan. Carefully release the springform pan.
- Decorate the cheesecake with a generous amount of homemade whipped cream, sliced bananas, and Nilla wafers.

Leave a Reply